If you’re like me and have recently developed an interest in climbing but lack woodworking skills and impulse control, you may find yourself building a home climbing wall for your chid. The idea of creating your own wall might seem daunting at first, but it’s more accessible than it seems. This article will walk you through the entire process from planning to construction designed for beginners with minimal woodworking knowledge.
Why Drywall Won’t Work
The initial thought might be that you can simply screw climbing holds into your drywall and start climbing. However, drywall is far too weak to support the weight of a human hanging from climbing holds. This could result in damaging your wall and injuring yourself. Instead, you will need to frame the climbing wall with three-quarter-inch plywood and attach it securely to the studs behind the drywall.
Step-by-Step Plan for Building the Childern Indoor Climbing Wall
Let’s start with an overview of how to properly structure your Childrens indoor climbing wall in home.
The Framework: Your drywall will have two-by-four studs behind it, spaced about 16 inches apart. To create the childrens indoor climbing wall you’ll need to attach more two-by-fours on top of the drywall, screwing them into the studs for extra support. After that, you’ll screw your plywood onto these two-by-fours.
Drilling and Attaching T-Nuts: Before you screw the plywood to the wall, you need to drill a grid of holes and hammer in T-nuts from the back. These T-nuts will allow you to bolt on the climbing holds from the front, giving you the flexibility to rearrange the holds later or add more as needed.
1. Finding the Right Wall
First, choose a wall in your house where you want to build the climbing wall. Ensure the area is free from nearby obstacles that could cause injuries if someone falls off. Most ceilings are around eight feet high, which is a perfect size for a four-by-eight sheet of plywood.
2. Planning the Layout and Lumber
Before cutting any wood, it’s important to make a detailed drawing of your layout. Whether you do this by hand or use a simple program like PowerPoint, planning will save you time and materials. You should also start thinking about how many holes you want to drill into the plywood, as this will determine how many T-nuts you’ll need to buy.
3. Buying the Climbing Holds
You can purchase climbing holds directly from manufacturers such as Motoleos or Atomic. Be careful when buying holds from online stores like Amazon, as cheaper playground holds won’t offer the same quality and texture as real climbing gym holds. Proper climbing holds have a gritty, sandy texture that provides better grip, and they typically cost between $6 to $10 per piece.
4. Preparing and Cutting the Lumber
Since I built my wall in a basement with a drop ceiling that is slightly less than eight feet, I had to cut my two-by-fours to the right length. I pre-drilled holes in the two-by-fours before attaching them to the studs, which makes it easier to secure them. I also used sheet metal screws for extra stability because my basement has metal studs.
5. Installing the Plywood
Once your two-by-fours are securely attached to the wall, it’s time to install the plywood. If your ceiling is less than eight feet, you’ll need to trim the plywood to fit. Use a guide for cutting large pieces of plywood, or have the cuts made for you at a home improvement store. Be sure to sand the cut edges to avoid splinters.
6. Marking and Drilling the Hole Grid
Use a measuring tape or T-square to mark where the grid of holes will be drilled. A chalk line can help create straight lines for a more accurate hole pattern. Drill smaller pilot holes first to avoid tear-out, then use a larger spade bit to drill holes for the T-nuts.
7. Painting and Hammering in the T-Nuts
Before hammering in the T-nuts, I decided to paint the plywood a light gray to give it a stone-like appearance. I used floor paint because it’s designed for high-traffic areas. After the paint dried, I hammered in the T-nuts from the back of the plywood. Be sure to have the right size holes so the T-nuts fit snugly.
8. Attaching the Plywood to the Wall
Once the T-nuts are in place, you can attach the plywood to the two-by-fours on the wall. Pre-drill and countersink screws every foot to ensure a strong, flush surface.
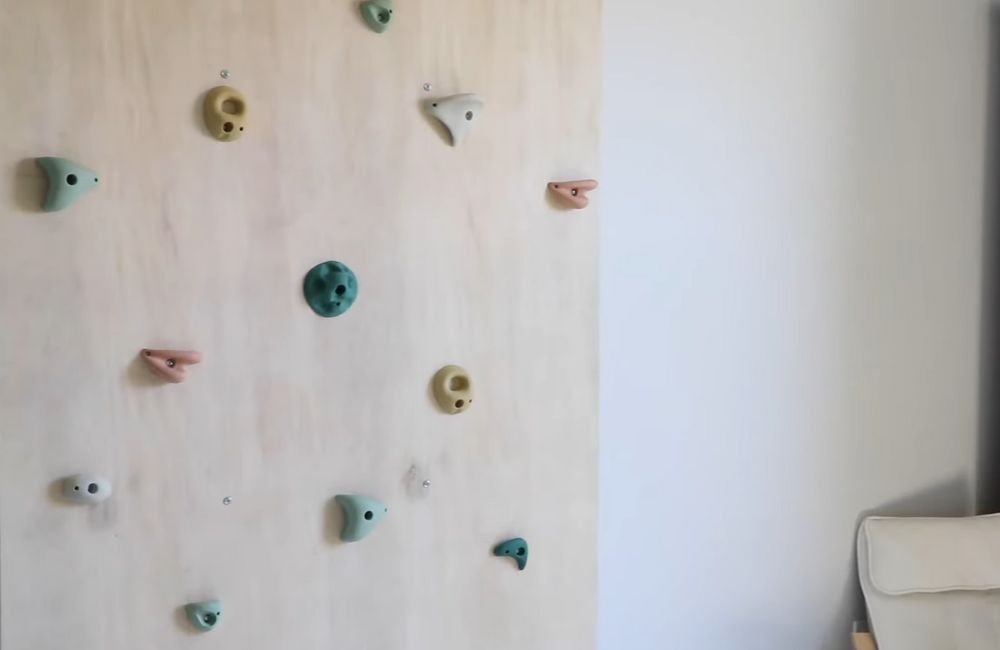
9. Mounting the Climbing Holds
Now that your wall is up, it’s time to mount the climbing holds. Most holds come with an Allen wrench for screwing them into place. Some holds also have a second hole for a stabilization screw, but you can wait to finalize the route and positioning of the holds before attaching these.
10. Planning the Climbing Routes
If you’ve been to a climbing gym, you’ll know that routes are often color-coded. You can do this at In Home Child Game if you have enough holds of different colors. If not, you might need to mix and match. Make sure you have enough holds to create a good variety of routes.
11. Safety First: Soft Landing
Finally, remember that safety is key. You don’t want kids falling directly onto a hard floor, so be sure to invest in a gymnastics mat or crash pad.
Final Thought
Building a DIY climbing wall at home is a rewarding project for your kids, even for someone new to climbing and woodworking. With some basic materials and tools, you can create a sturdy, safe climbing wall that provides hours of fun for your kids. Follow these steps, and soon you’ll have a fully functional climbing wall in your own home.